Integration with Aisino A90 cash registers is now available for properties in Armenia.
What you need to start working
Install Aisino A90 cash register. The property should purchase and set up the cash register, as registration on behalf of the property legal entity is required.
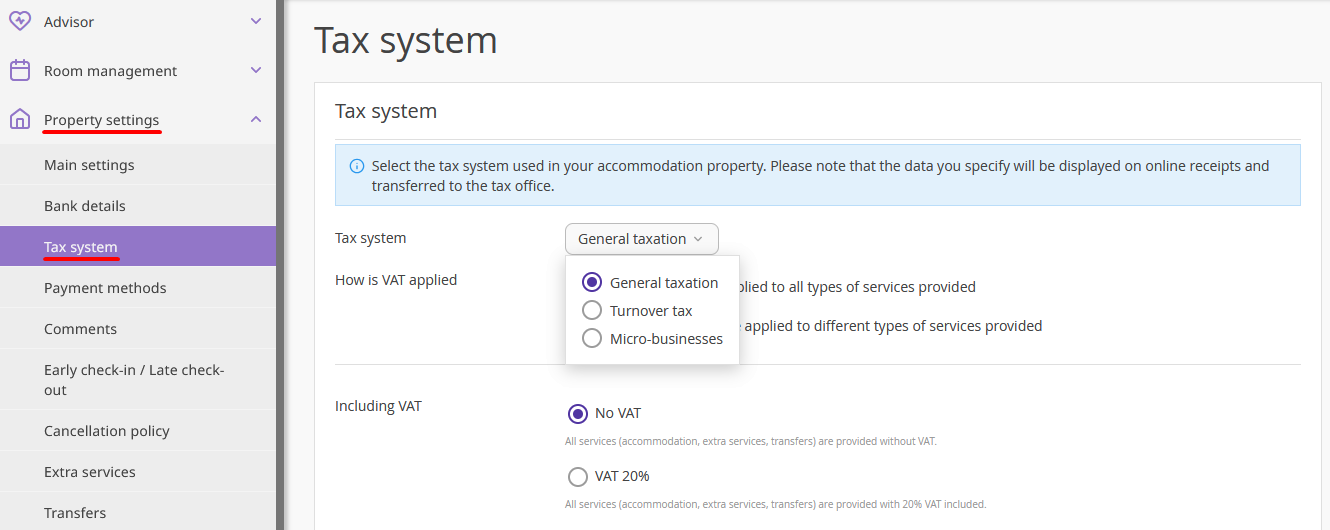
Specify the taxation rate in the Exely extranet. To do this, go to the “Property settings” > “Tax system” section and select the taxation system used in your property.
Install and configure Exely Agent.
How to install and configure Exely Agent
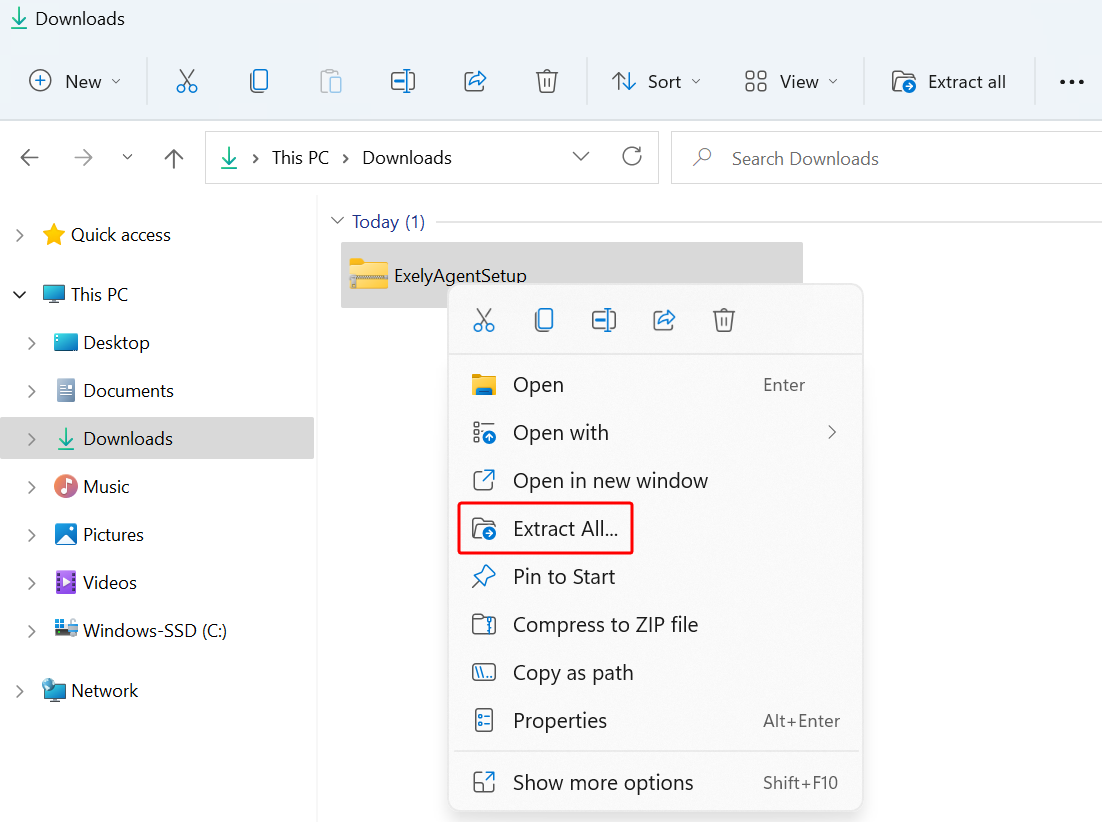
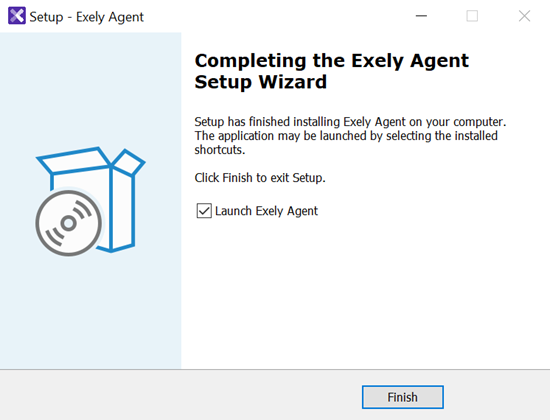
1. Download Exely Agent installation file.
2. Unzip the downloaded file.
3. Double-click the extracted file to open it and follow the setup wizard instructions.
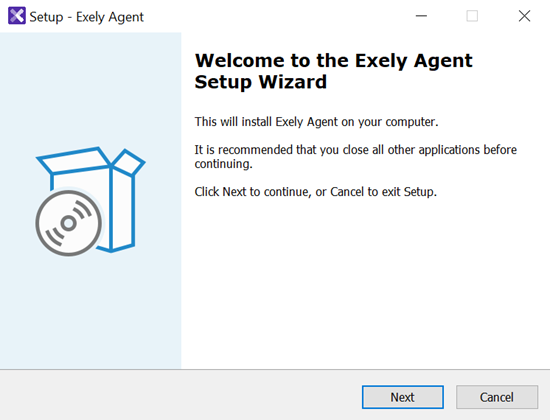
4. After successfully installing Exely Agent, launch the application.
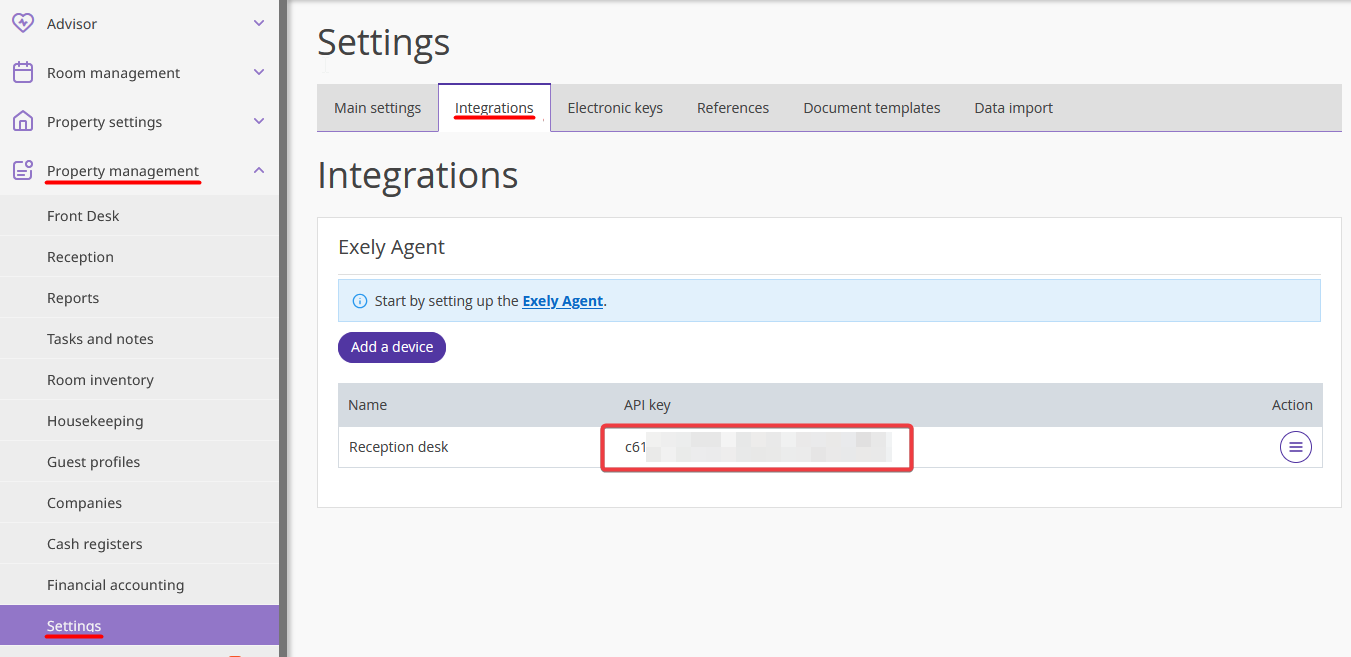
5. In the Exely extranet, go to “Property management” > “Settings” > the “Integrations” tab. Copy the API key.
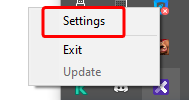
6. Find Exely Agent in the taskbar, right-click the icon and select “Settings”.
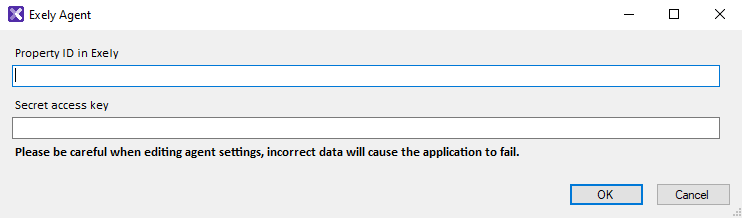
7. In the opened window, enter the property ID in the “Property ID in Exely” field. Paste the integration key for the current reception (computer) into the “Secret access key” field.
How to set the integration of Exely PMS and Aisino A90
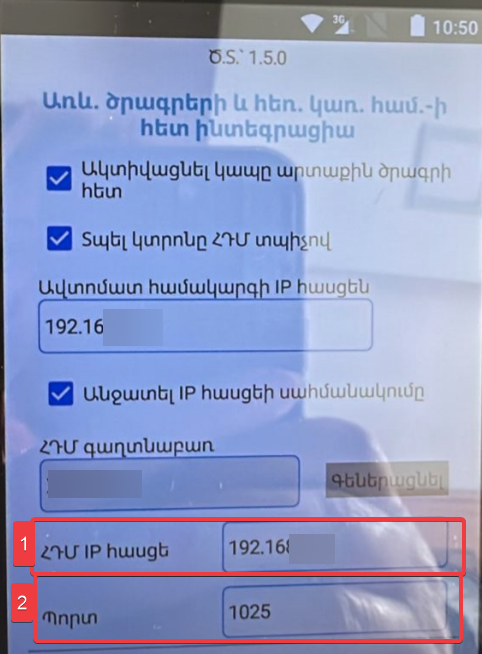
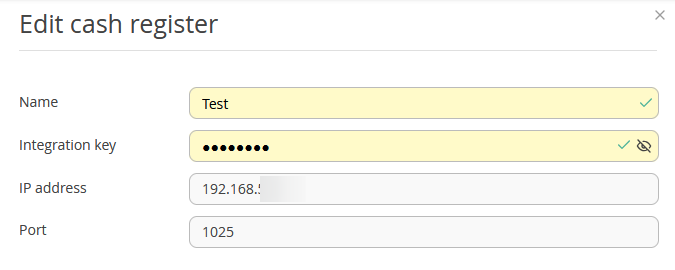
1. Open the cash register settings and copy the values of the “Cash register IP address” (1) and Port (2) fields.
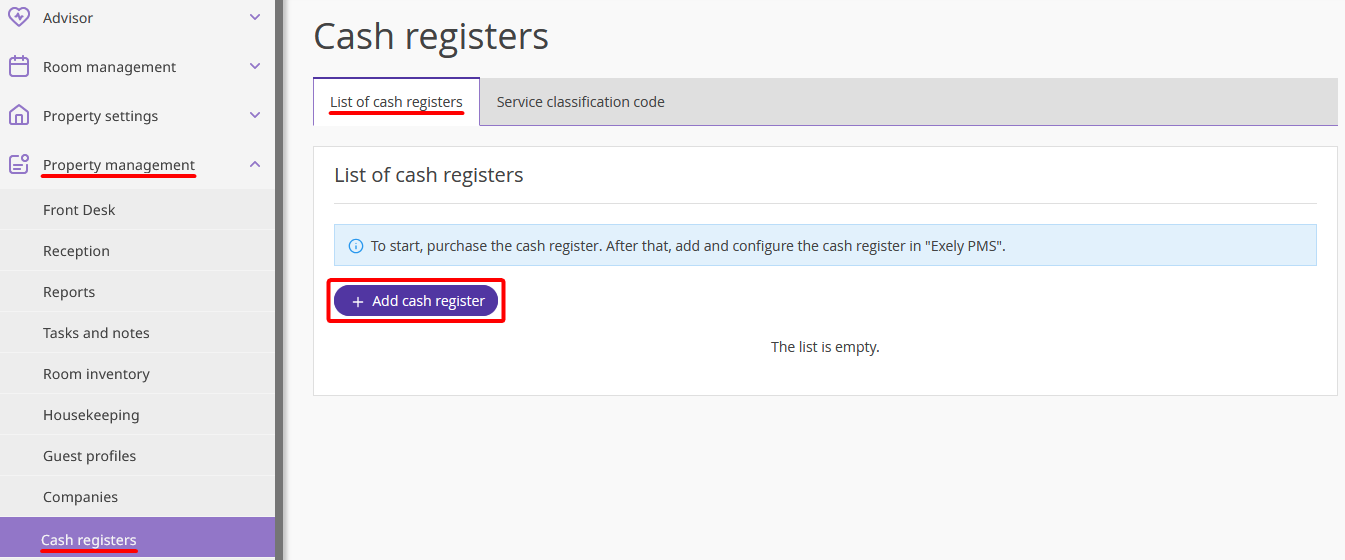
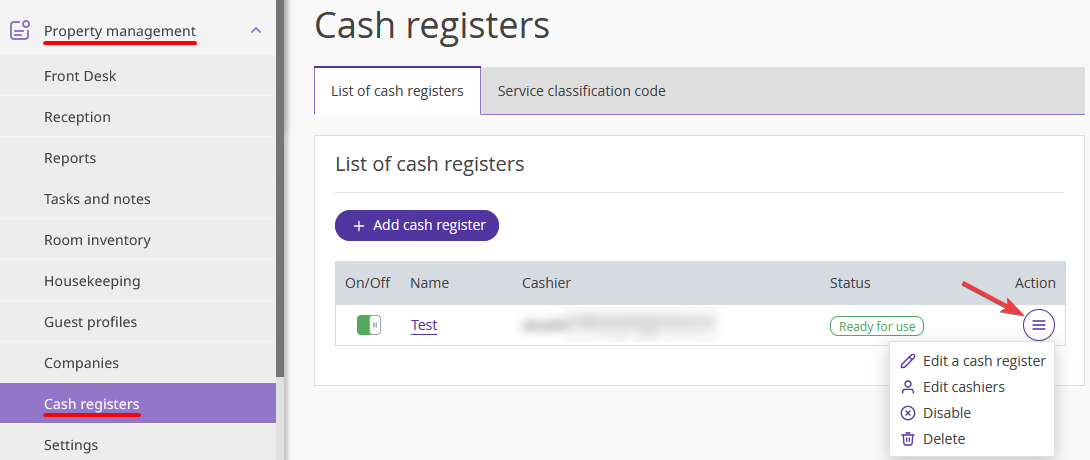
2. To set up a cash register in Exely extranet, go to "Property management" > “Cash registers”. On the “List of cash registers” tab, click “Add cash register”.
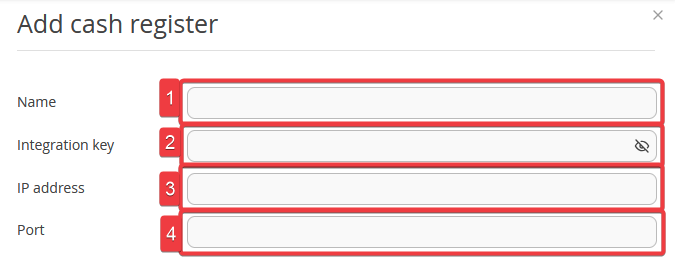
In the opened sidebar, fill in the following fields:
Name (1) — the cash register name that an employee will see when selecting the cash register through which a receipt will be printed.
Integration key (2) — password for authorisation in the cash register. It is issued upon cash register purchase.
IP address (3) — specify the cash register IP-address which you copied from the cash register settings earlier, for example 192.168.2.8.
Port (4) — specify the port which you copied from the cash register settings earlier, for example 1015.
Click “Save”.
After the settings are saved, a line with information about the added cash register will appear in the table.

At this stage you can edit the cash register parameters or delete it, but you need to add cashiers for the cash register to work.
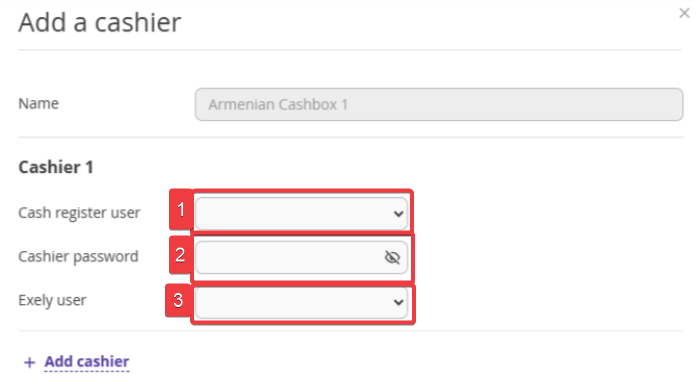
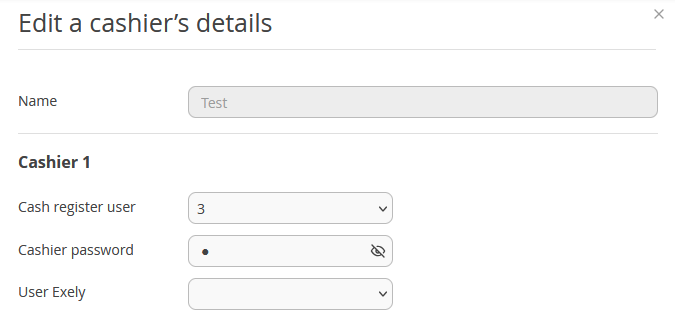
To add cashiers, click “Action” > “Add cashier”.

In the opened window, fill in the following fields:
Cash register user (1) — cashier login saved in the cash register memory. It is provided upon cash register purchase and can be found in the cash register settings.
Cashier password (2) — it is also saved in the cash register memory when you purchase and install it.
User Exely (3) — select an employee from the list who will process payments and print receipts.
Once the fields are filled in, click “Save”.
How to view the list of added cash registers
To see a list of all available cash registers, go to “Property management” > “Cash registers” > the “List of cash registers” tab.
The switch in the “On/Off” column allows to deactivate the selected cash register. Once a cash register is deactivated, it is hidden in the list of cash registers for selection when printing receipts. You can activate the cash register again using the switch.
To activate a cash register, it is necessary to add at least one cashier for it.
To edit the cash register settings, click the cash register name or “Action” > “Edit a cash register”.
To disable or delete a cash register, add or edit cashiers, click “Action” and select the corresponding option.
If you click the cash register name or “Action” > “Edit a cash register”, a sidebar with the cash register settings will be opened. This is the same form you used when adding the cash register, but with the settings fields filled in.
Make the required changes and click “Save”.
If you click “Action” > “Edit cashiers”, a sidebar with the cashiers settings will be opened.
Make the required changes and click “Save”.
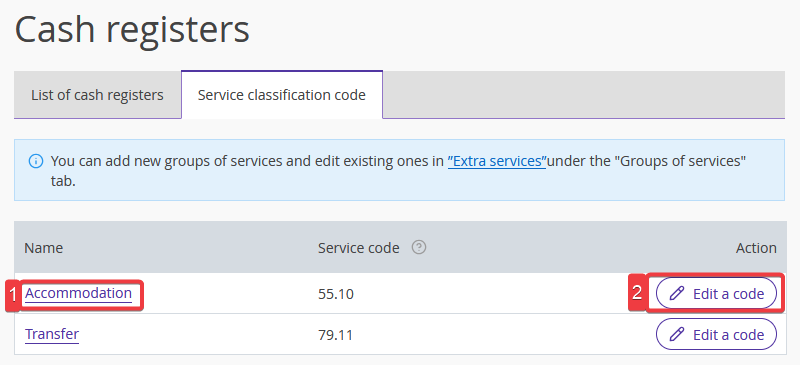
How to add service classification codes
Before you start printing receipts, fill in the corresponding classification codes for services provided in the property. For this, go to “Property management” > “Cash registers” > the “Service classification code” tab.
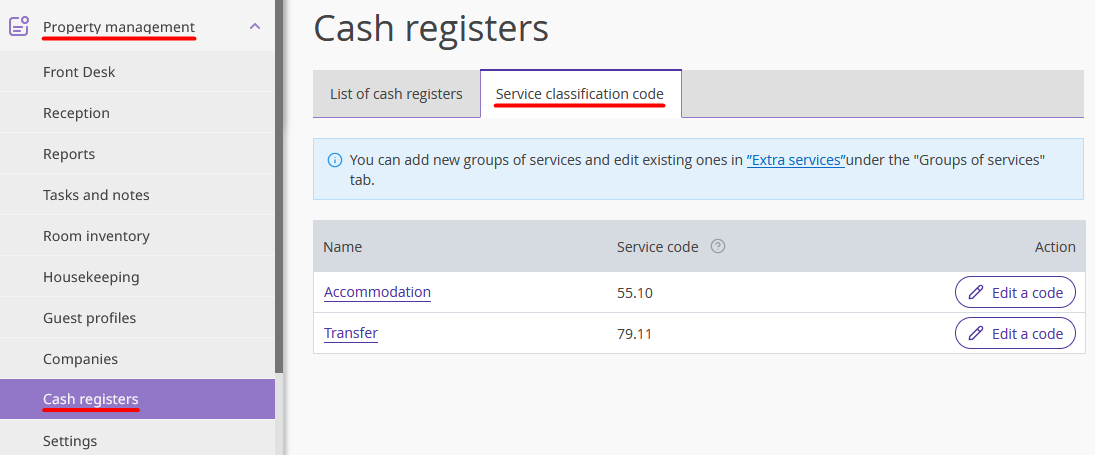
On the page, the groups of services that are entered in the Exely extranet of the property are listed. The codes for accommodation and transfer services will already be pre-filled, edit them, if necessary.
To add or edit a service code, click the service group name (1) or the "Edit a code" button (2) in the "Action" column.
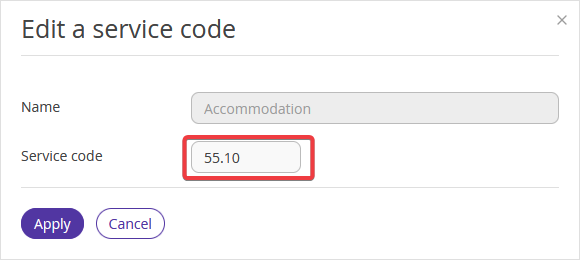
In the opened window, enter the service code and click “Apply”. The saved code will be displayed in the receipt details when paying for the corresponding service.
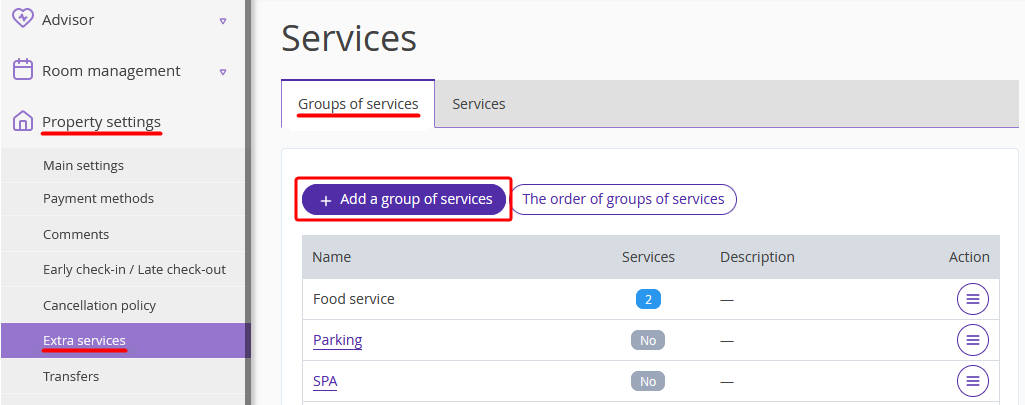
To add a new group of services, go to “Property settings” > “Extra services” > the “Groups of services” tab and click “Add a group of services”.
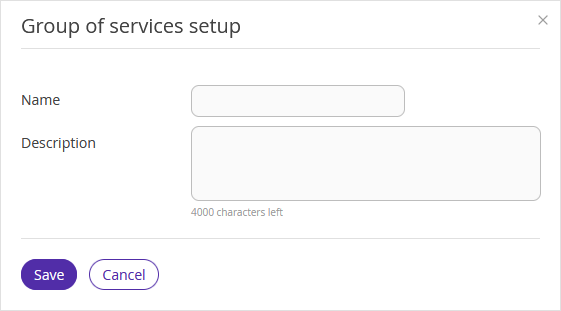
In the opened window, enter the service group name and description and click “Save”.
Important:
Service classification codes must be completed for all groups of services, as they will be displayed in receipts.
If the classification code is not filled in for a service, the accommodation service code will be shown for it when printing a receipt.
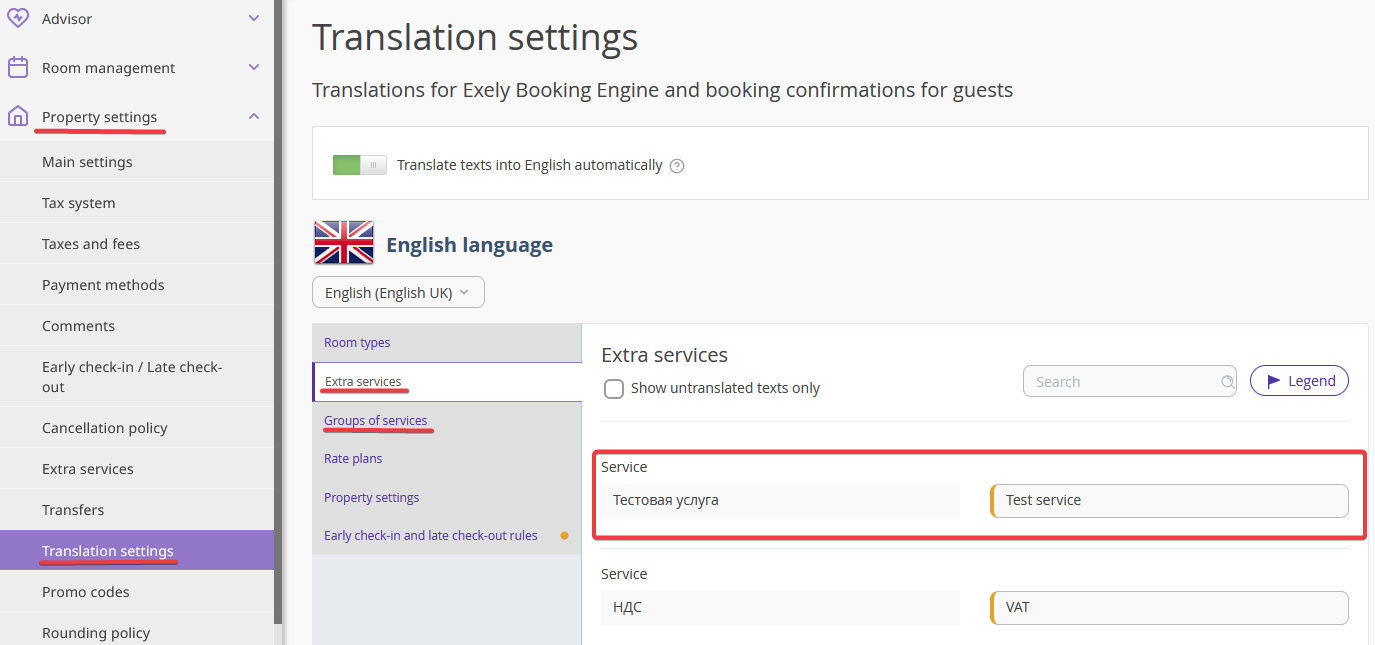
How to translate service names
According to the Armenian legislation, only the names of services in Armenian or English should be displayed in receipts. If you use the Exely extranet in Russian and the names of services and groups of services are also indicated in Russian, they should be translated into Armenian and English.
For this, go to “Property settings” > “Translation settings”. On the “Extra services” and “Groups of services”, select the required language and translate the names.
How to generate a receipt using a cash register
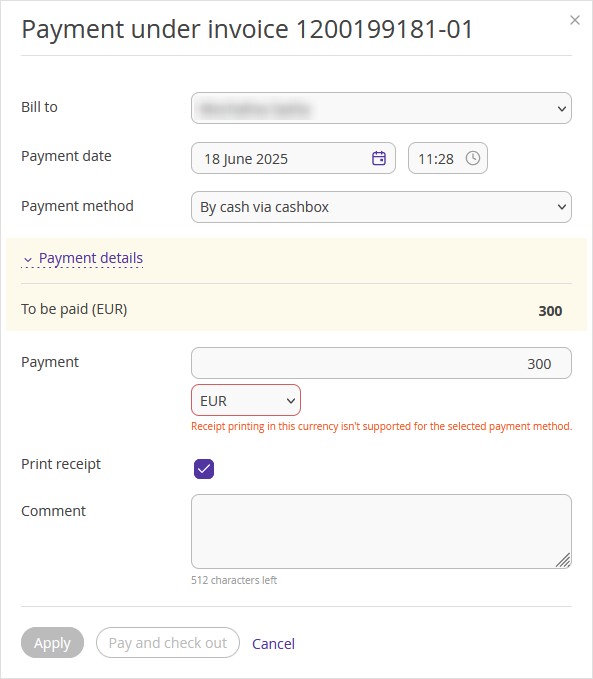
Step 1. When making a payment, select a payment method from the list (1). In the “Payment details” section, you can also select the services for which you are accepting payment. To do it, change the position of the switch next to the service name to "On".
If you do not need a receipt for this transaction, uncheck the “Print receipt” box (2) and click "Apply". The payment will be processed without printing the receipt.
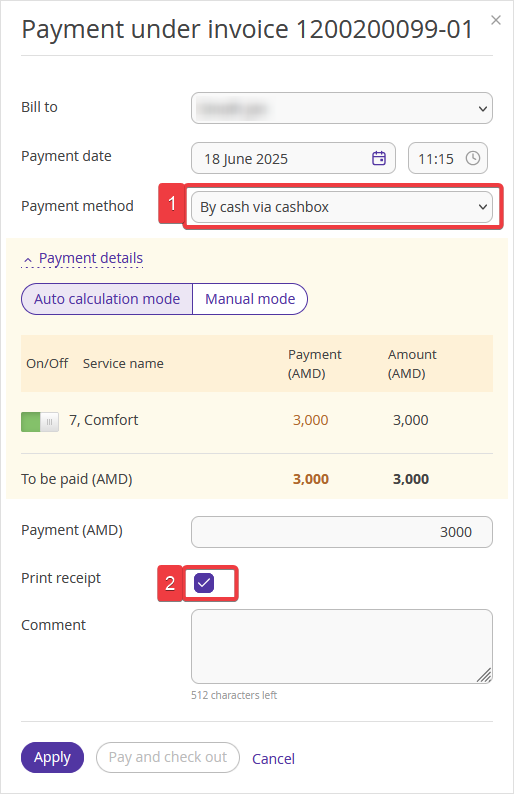
Pay attention. If you have made a payment without printing a receipt, you will not be able to print the receipt for that payment later.
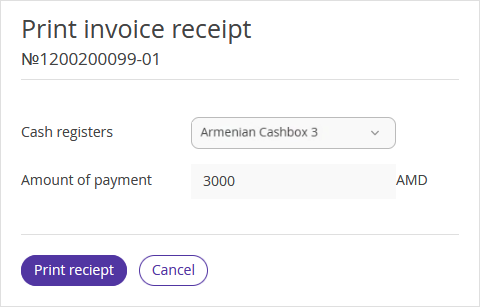
Step 2. In the opened window, select a cash register from the list and click “Print receipt”.
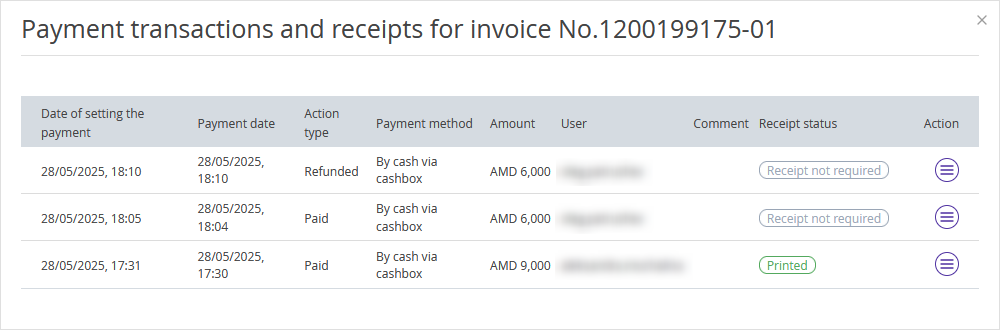
Step 3. After the payment is completed, you can view the receipt status. To do this, in the "Invoices and payments" tab, find the required invoice and click “Action” > "Transactions with payments and receipts".
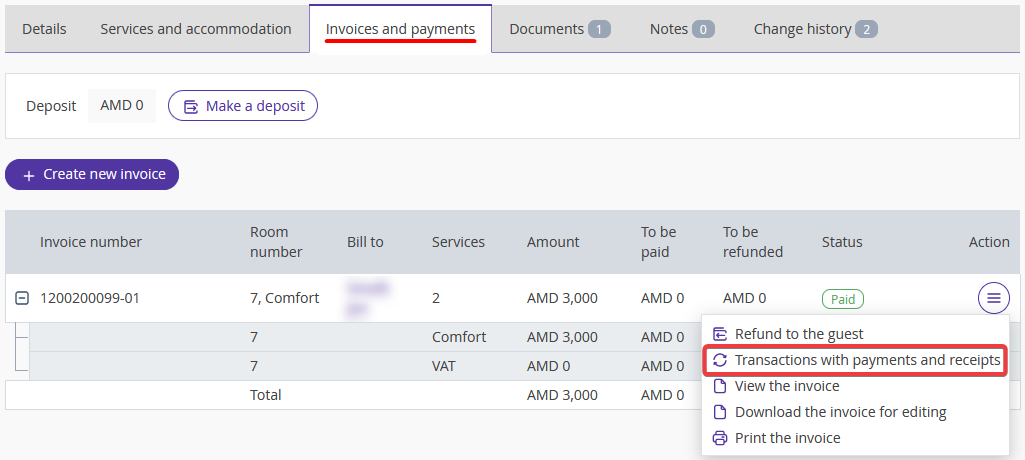
In the opened window, you will see all payments and refunds made for the invoice and the receipt statuses for them.
Pay attention. It may take a few minutes to generate a receipt. When the receipt generation is complete, its status will change to "Printed".
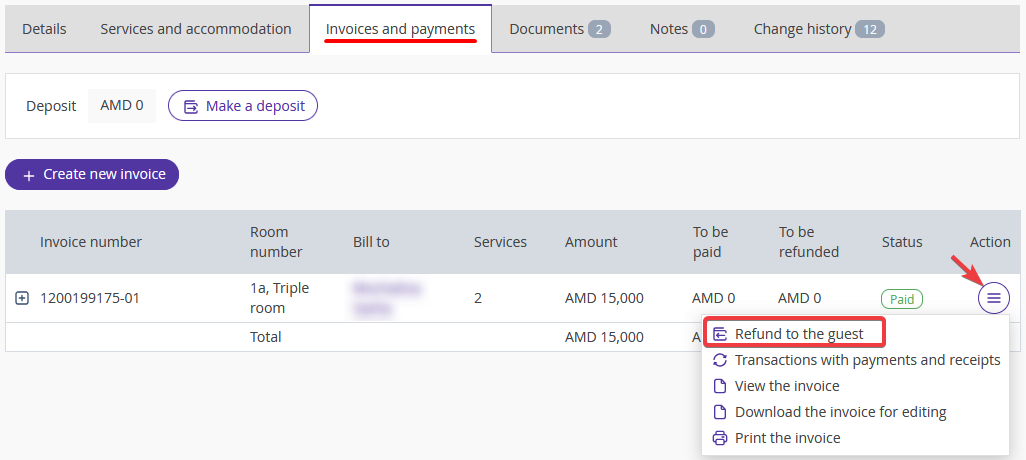
How to make a refund
To make a refund for an invoice, open the booking details card and switch to the “Invoices and payments” tab. There, click “Action” > “Refund to the guest” for the required invoice.
In the opened window, select the payment method (1).
In the “Invoice payment” field, select a payment for which you want to make a refund (2). You can only make a refund on one payment at a time.
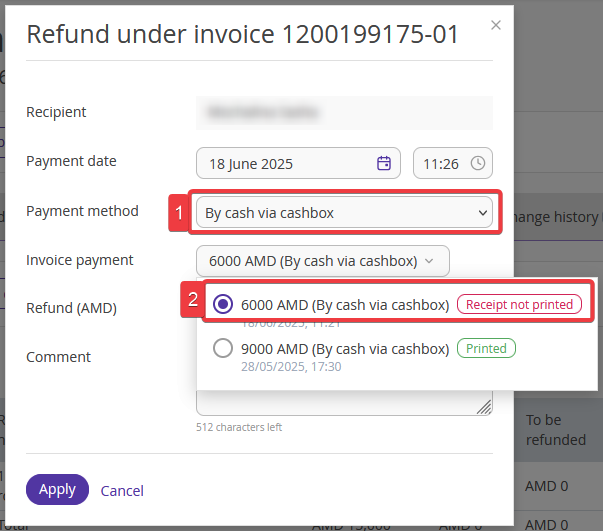
In the list of payments, the receipt status is indicated for each payment — in case of refund, you can print a receipt, only if a receipt for the payment has been printed.
Bookings in a currency different from the property's currency
For bookings with a payment currency other than Armenian Dram (AMD), it is also possible to accept payments. Please pay attention to the selected currency when making the payment.

The payment will be processed in the selected currency, and you can correct this only by cancelling the payment or making a refund.
Pay attention. You can print a receipt only for payments made in Armenian drams (AMD). If another payment currency is selected, the system will not allow you to print a receipt.