To work with API requests, you need to authorize on the Exely public API platform — Exely Connect.
Authentication process
Authentication is done through OAuth2.0.
OAuth 2.0 is an authentication standard that allows apps to access data.
To work with API, you need to pass the JSON Web Token (JWT) access key in requests.
JWT (JSON Web Token) is a special token format that allows secure data transfer between a client and a server.
The JWT is obtained through Client credentials flow, i.e. authorization by a secret access key
The Client ID and Client Secret parameters are required to request an access key.
Interaction diagram
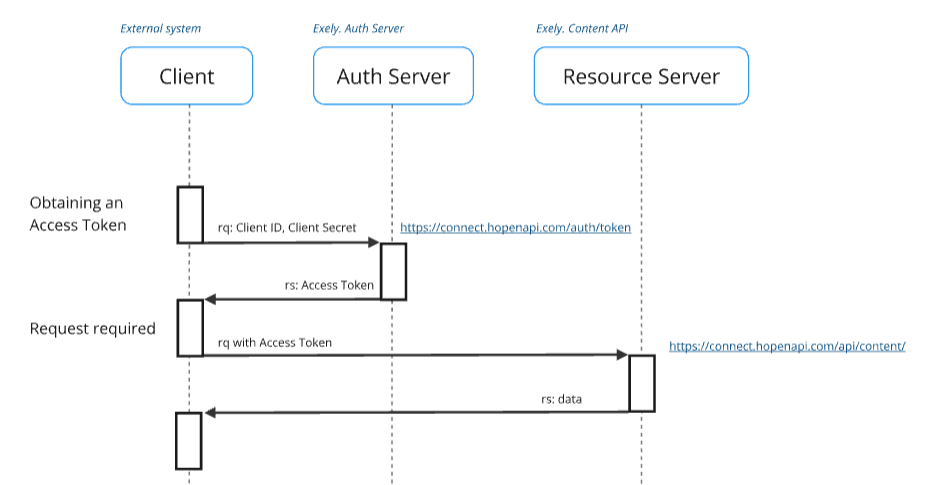
Exely. Auth Server: https://connect.hopenapi.com/auth/token
Exely. Content API: https://connect.hopenapi.com/api/content/
Access Token
Authentication limits: 3 per second, 15 per minute, 300 per hour per IP address.
Token lifetime: 15 minutes.
Authentication endpoint: PROD — https://connect.hopenapi.com/auth/token
Example of Access Token:
eyJhbGciOiJSUzI1NiIsInR5cCIgOiAiSldUIiwia2lkIiA6ICJhWF9SYVkxak01LVJzcTYyb3ZUbjd2QVE3MFBraWZHdXIwZW5mdU1XUGFnIn0.eyJleHAiOjE3Mzc2MjY2NjIsImlhdCI6MTczNzYyNTc2MiwianRpIjoiYjcxZTRhODctODM1Ny00NzJlLTg5YTUtNjhjMjA1ZGYwYTkyIiwiaXNzIjoiaHR0cHM6Ly9jb25uZWN0LmhvcGVuYXBpLmNvbS9hdXRoL3JlYWxtcy9Db25uZWN0QXBpIiwiYXVkIjoiRXhlbHkuQ29ubmVjdEFwaSIsInN1YiI6ImY0MjRkOWY4LWYzMWYtNDgxMy1hMjY5LWYyMmY4ZTgzZjlkNyIsInR5cCI6IkJlYXJlciIsImF6cCI6ImRlbW9fcGFydG5lciIsInNjb3BlIjoiIiwiYXBpX2FjY2Vzc2VzIjpbImNvbnRlbnQiXX0.F4LxcnCZQ2HhdnXWfDa_lf0eqN3wq1Aq6DnOydnpElfa3QG5qkbU-ejdY6d4fpPJHQM57maxTkWs_rG6ZBi7qcAn8p1YdlXK0J7HT4e52MK3B-09ABO-DtzO4TxVN1z8iUr9mHoNSxIqSA2Nq9h0Z2cLqvvAJpSsaSsHBRCKC1WW6MMu7eSXNk4LKy6aq6h-hPXCzKG70WknukDp7Uiy7P0WVnVM4KMVD2WiS0tCOho4VVuVuLb68bSUqxgo9G5Zp3MiKyinixmgx1x9P5V_GVGDKBpNjuHde0FmlrnAMbrgF6azZUNmOBd19sp09MDnItQu5wDJFQObelTY1fkD9g
You can decode Access Token on the JWT.IO website.
Example of a decoded token:
PAYLOAD:
{
"exp": 1737626662,
"iat": 1737625762,
"jti": "b71e4a87-8357-472e-89a5-68c205df0a92",
"iss": "https://connect.hopenapi.com/auth/realms/ConnectApi",
"aud": "Exely.ConnectApi",
"sub": "f424d9f8-f31f-4813-a269-f22f8e83f9d7",
"typ": "Bearer",
"azp": "demo_partner",
"scope": "",
"api_accesses": [
"content"
]
}
Note. Refresh token is not used.
Best practices
1. Cache an Access Token on the client side and reuse it in your requests.
2. Use libraries for OAuth2.0:
.net
https://identitymodel.readthedocs.io/en/latest/client/overview.html
Microsoft.Extensions.DependencyInjection
js
https://www.npmjs.com/package/oidc-client?activeTab=readme
https://github.com/IdentityModel/oidc-client-js/wiki
php
https://github.com/jumbojett/OpenID-Connect-PHP
curl
curl -L -X POST "https://connect.hopenapi.com/auth/token" -H "Content-Type: application/x-www-form-urlencoded" -d "grant_type=client_credentials" -d "client_id=XXXXXXXXXXXX" -d "client_secret=XXXXXXXXXXXX"
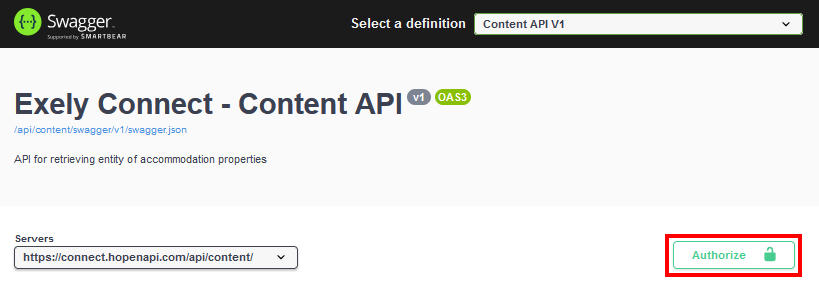
How to make an API request in Swagger
Swagger is a tool that allows you to automatically describe an API based on its code.
Specifications and examples are available in Swagger.

To make an API request:
1. Select the required API in the drop-down list.

2. Authorize using Client ID and Client Secret.
3. If you switch to a different API, authorize again.
The API is operated by sending GET or POST requests.
In case of incorrect requests or problems in API operation, error information is returned.
How to authorize in Swagger
1. Click the “Authorize” button.
2. In the “oAuth2 (OAuth2, clientCredentials)” section, enter the Client ID and Client Secret values and click “Authorize”.

3. Then, click “Close”.
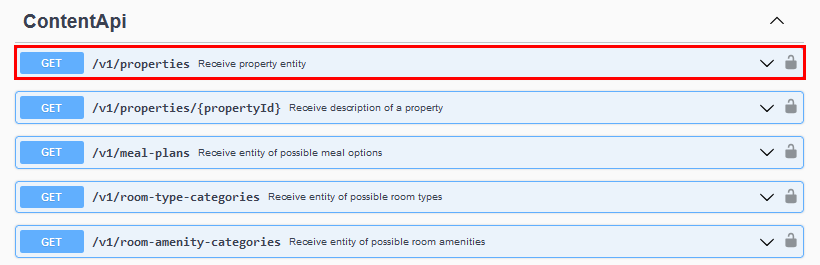
How to make an API request in Swagger
The sequence of actions described below is used to make a request for any of the methods in the API description.
1. Select API:
Content API — photos and description of properties, room types, rate plans, extra services;
Read Reservation API — information on the properties’ bookings;
2. Select the request type available for the selected API. For example, “Receive property entity”:
3. Click “Try it out”:

4. Enter the required values:
5. Click “Execute”:
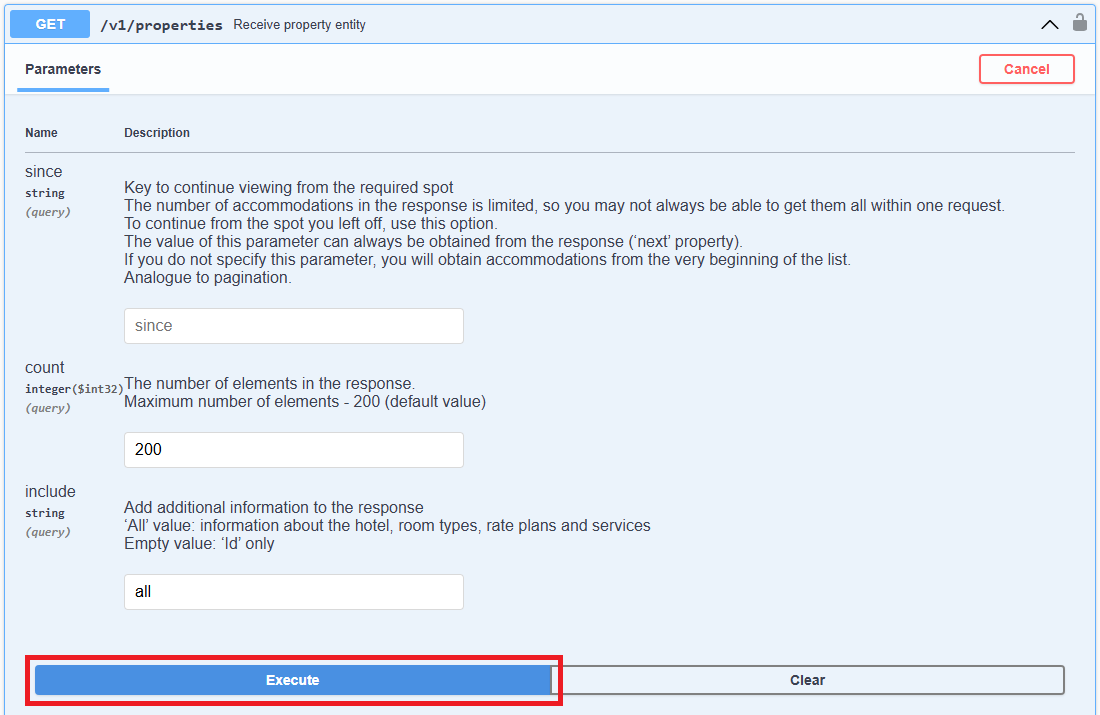
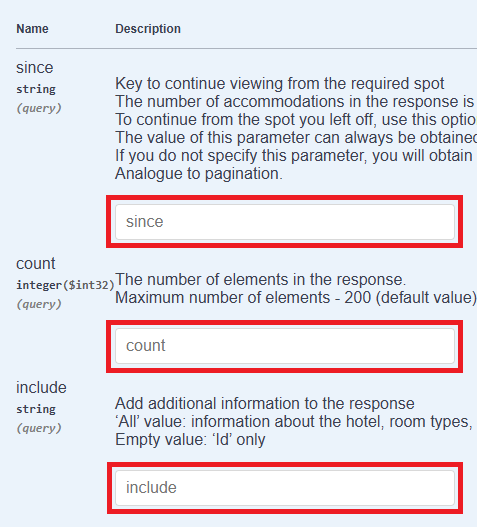
Note. Before executing the request, pay attention to the description of the parameters.
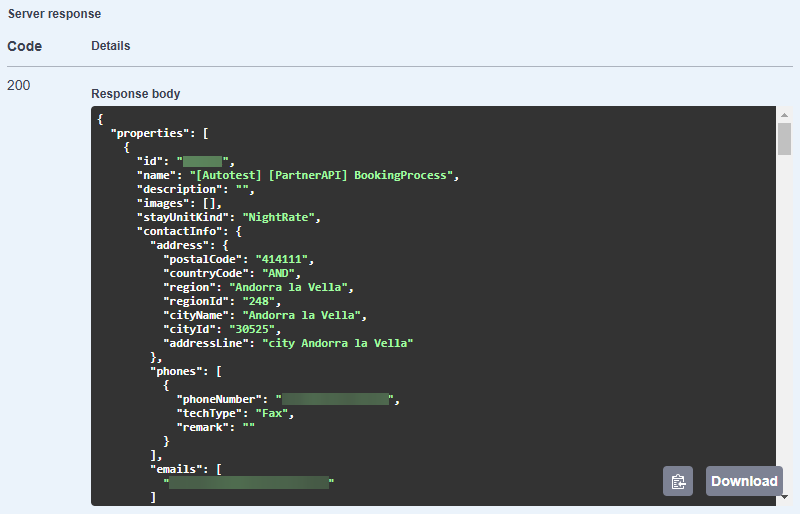
If the request is successful, you will receive ‘Code 200’ and a detailed description of the property in response.
If an error has occurred, you will receive an error code and a description of the error. For example:
Code 400 — incorrect request.
This error can occur if you sent incorrect data.
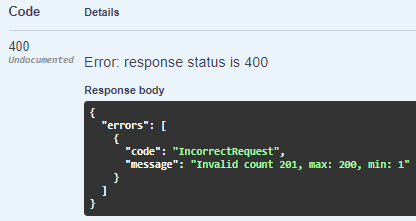
In the example above, the allowed number of elements that was entered in the count field was exceeded.
Code 401 — authorization error.
The error can occur if you sent incorrect authorization details.
All other requests to the API are executed in the same way.
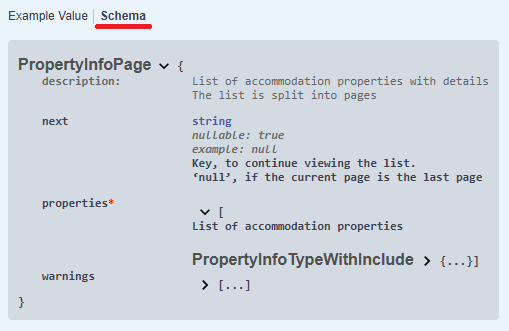
To see all incoming and outgoing parameters, their types and description in the method, click Schema.