In the Exely extranet, you can create users with different levels of access to the extranet.
NOTE. As the personal data controller, you are responsible for ensuring that guests, employees or representatives or that of a third party have given valid consent before their personal data is entered. See Part 2 under "WHAT PERSONAL DATA DO WE COLLECT?" in our Extranet Privacy Policy for details.
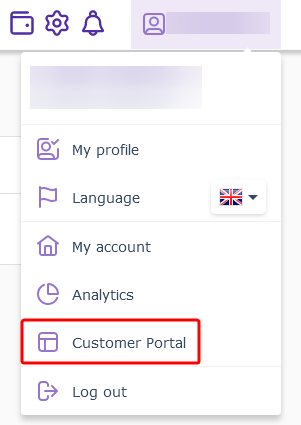
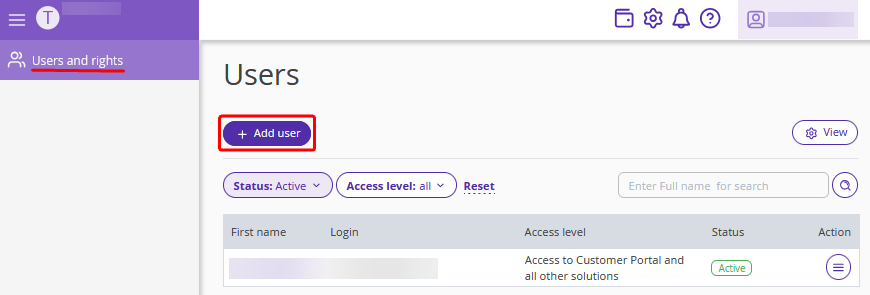
1. In the Exely extranet, click your login in the top right corner of the Exely extranet and go to the “Customer portal” > “Users and rights” section.
2. Click the “Add user” button.
3. Fill in the required fields:
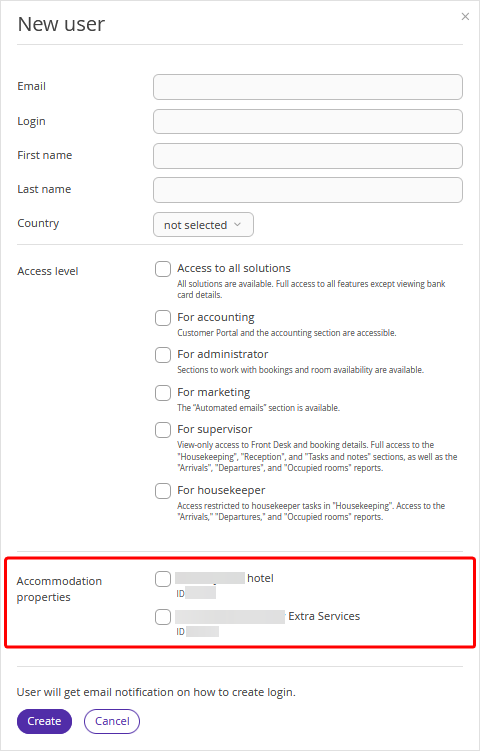
Enter user email — it should be unique, i.e. not used before.
Come up with a login — it should be unique, i.e. not used before. By default, the user’s email is set as a login, but you can change it if you wish.
Indicate the user's first and last name.
Indicate the user's country.
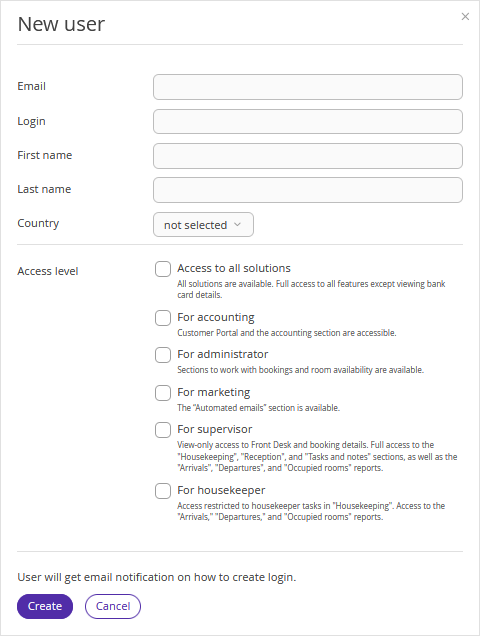
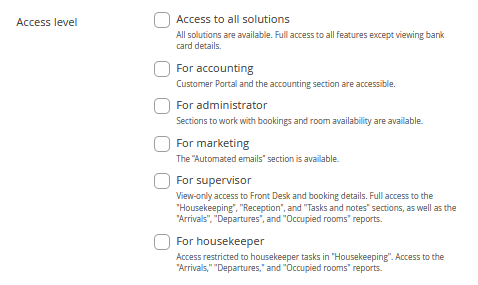
4. Select the access right level:
Access to all solutions — access to all Exely Suite solutions. This user has no access to Exely Customer Portal.
For accounting — access to all the sections related to accounting in the Exely solutions and Exely Customer Portal.
For administrator — access to sections meant for the booking and availability management.
For marketing — access to the “Automated emails” section.
For supervisor — view-only access to Front Desk and booking details. Full access to the "Housekeeping", "Reception", and "Tasks and notes" sections, as well as the "Arrivals", "Departures", and "Occupied rooms" reports.
For housekeeper — access only to the assigned housekeeper tasks in the “Housekeeping” section and the "Arrivals", "Departures", and "Occupied rooms" reports.
To create a user with access to Exely Customer Portal and all Exely Suite solutions, send a request to your Customer Support manager or Exely Customer Support team.
5. Sometimes a property may work with several properties under one contract: for example, a hotel and a separate extranet for the sale of gift cards. In this case, when creating a user, an additional section is added in the user creation form — "Accommodation properties".
The "Accommodation properties" section contains a list of properties with IDs that work under one contract. Select, which extranets the user will have access to.
Pay attention. The user's access level in the extranet for all properties is the same. If it is necessary for an employee to have a different access level in another property, create a new user.
If such section is not available, and it is required to provide access for a user to another property, send an email request to your Customer Support manager or Exely Customer Support team from the email address of a user that has access to Exely Customer Portal for the required property. In the request, specify the property's Exely ID and the new user login. The request should be sent after the new user is created.
6. Click the “Create” button.
Pay attention. If you get an error after clicking the "Create" button, it means you specified an existing login or email address when creating a user. Try to create the user again and specify another login and email.
7. An email on the new user creation will be sent to the email address you indicated. For the first login, the user should click the link in the email and create a password.
8. After creating a password, the user clicks the "Log in to my personal cabinet" button. A confirmation code will be sent to the user's email.
9. After entering the confirmation code, the new user must set up two-factor authentication via an authenticator app. This will provide additional protection for data in the extranet, and the user will be sure that only they can log into the extranet with their credentials.
To do this, the user must scan a QR code on the screen using the authenticator app. The user can follow the setup steps using the prompts on the screen or refer to the instructions: "How to set up two-factor authentication via a mobile app".
After setting up two-factor authentication, the user will be able to continue working in the extranet.
To learn more about the "Users and rights" section and the available actions, refer to the article “How to manage the “Users and rights” section.”